
Temenos Lifecycle Management Suite - Origination Product Guide
Virtual Capture Settings
| Administrator Guide > Virtual Capture Overview > Virtual Capture Settings |
The Virtual Capture Settings page in System Management (System Management > Origination > Virtual Capture > Virtual Capture Settings) enables system administrators to create different instances of Virtual Capture for their institution in order to customize the virtual application process for specific groups of applicants, based on institutional preferences for messages, branding, products, cross-sells, etc. that meet the needs of each group.
This page displays a list of all instances configured for Virtual Capture, and provides system administrators the ability to easily create and manage the instances available for their institution.

The grid in this page is grouped by instance type (Individual or Vendor), and displays the following columns of information for each instance:
 |
If an institution does not use the Merchant Lending functionality, and/or does not have any Vendor instances configured, the Vendor grouping does not appear in the Virtual Capture Settings page. |
| Column | Description |
| Instance Name | Displays the name of the instance. |
| Instance Code | Displays the code assigned to the instance. |
| Instance Type | Displays a value of Individual or Vendor to identify the instance type. |
| Active | Displays a  if the instance is active. if the instance is active. |
| Modified By | Displays the name of the user who last modified the instance. |
| Modified Date | Displays the date that the instance was last modified. |
The Virtual Capture Settings topic includes the following information to assist administrators with creating and managing instances for Virtual Capture:
All Virtual Capture instances share common attributes that are defined within the following tabs when creating, copying, or editing an instance:
The General tab provides the ability to define the basic information for each instance of Virtual Capture, as well as activate the instance for the institution.
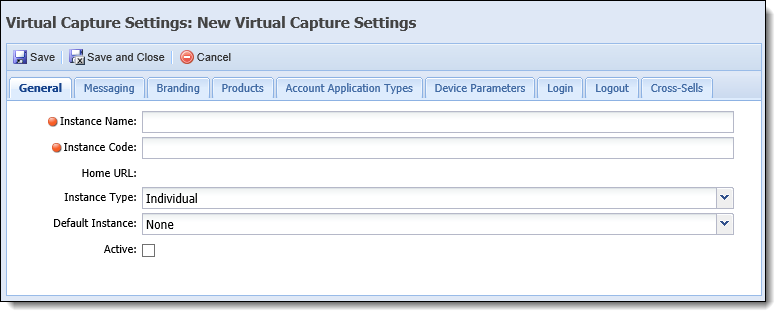
The following instance attributes are defined in the General tab:
| Attribute | Description | ||||||||
| Instance Name |
Enter a name for the instance. This field is not case sensitive, and must include a unique value.
|
||||||||
| Instance Code |
Enter an alphanumeric code to be used to identify the instance. This field is not case sensitive, and must include a unique value.
|
||||||||
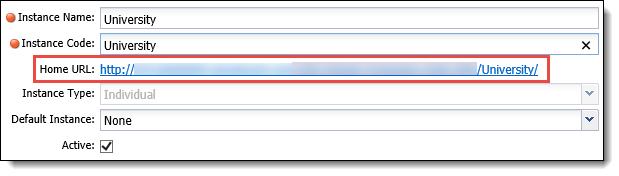
| Home URL |
Read-only field that populates with a URL to the Virtual Capture instance. This field is blank until an Instance Code is entered. Once an Instance Code is entered, this field populates with a link that navigates directly to the Virtual Capture instance, as shown below:
|
||||||||
| Instance Type |
Select Individual or Vendor to identify the type of instance being created. This field defaults to Individual.
|
||||||||
| Default Instance |
If desired, select an instance from the drop-down list to enable the ability to copy the settings from that instance to the one being created. This drop-down includes a value of None, and a list of all active instances of the same instance type.
By default, this field is set to None, which identifies that each tab of attributes is unique to the instance being created, and disables the Use Default Settings check box within each tab. When an instance is selected, the Use Default Settings check box is enabled within each tab, and administrators can individually determine which settings from the default instance are copied to the new instance.
For example, when an institution offers various products to different universities, administrators can create a base instance that is used for all universities, and then separate instances for each specific school. This functionality allows administrators to apply certain settings from the base instance across all school instances, such as basic messaging and login information, while customizing other settings on an individual basis that make the virtual experience unique for each university, such as branding.
|
||||||||
| Active |
Select the check box to enable the instance for the institution.
|
The Messaging tab provides the ability to define the messages presented to applicants during the virtual application process, as well as configure certain settings for the instance, such as the number of days to show disbursed applications.

When a default instance is assigned within the General tab, the Use Default Settings check box can be used to automatically copy the Messaging attributes defined for the default instance to the instance being created.
|
This check box is disabled when Default Instance is set to None within the General tab. |
If it is desired to copy the Messaging attributes from the default instance, select the Use Default Settings check box within the top of the Messaging tab; otherwise, leave the Use Default Settings check box blank to define unique values for the instance.
 |
Once the Use Default Settings check box is selected, the fields within this tab are disabled, and populate with the values defined for the default instance. To learn more about this functionality, please see Default Instance within the General section of this topic. |
When Use Default Settings is not selected, the following attributes are editable within the Messaging tab, and able to be defined for the instance:
| Attribute | Description | ||||||
| Application Listing Text | Enter instructions or other text to appear within the List Applications screen for the instance of Virtual Capture. | ||||||
| Show Application Queue Name |
Select the check box to display the name of the queue to which an application is assigned in the Application Listing page for a vendor instance.
By default, this field is set to false. When set to true, a column titled Queue Name appears in the Application Listing page, which displays the name of the application's current queue in Temenos Infinity, or the default queue name assigned to the vendor instance. |
||||||
| Default Queue Name |
If Show Application Queue Name is set to true, enter the default queue name to populate within the Application Listing page for queues not configured to display their queue name in the Vendor Portal.
The value set within this field populates in the Queue Name column of the Application Listing page when Show Application Queue Name is true for the vendor instance, and Display Name in Vendor Portal is false for the queue that an application is assigned to in Temenos Infinity.
|
||||||
| Generic Error Message |
Enter a generic error message, which appears within a system error message when generated in the instance of Virtual Capture.
|
||||||
| Decision Error Message | Enter the text that appears to applicants if the decision process fails, and an error is generated by the system. | ||||||
| Use Shopping Cart |
Allows institutions to suppress applicants from applying for multiple products simultaneously in the instance of Virtual Capture. When this parameter is selected, the Shopping Cart displays in the Virtual Capture instance, and applicants are able to create an application with multiple products.
When this parameter is not selected, the following behavior occurs in the Products screen:
When this parameter is not selected, the following behavior occurs in the Account Products screen:
|
||||||
| Display Applications in Virtual Capture |
Allows institutions to identify if the list of in-progress applications display to an applicant in Virtual Capture.
When this parameter is set to true, a Suggested Applications page displays, which lists the current in-progress applications for the applicant. This page displays prior to creating an application when the following are true:
The list of current applications does not display if:
|
||||||
| Display Promotions in Virtual Capture |
Identifies if the promotional offers configured in System Management > Origination > Promotions are able to be presented to eligible applicants in the instance of Virtual Capture. By default, this parameter is set to false. If it is desired to display active promotional offers to eligible applicants during the virtual application process, select the Display Promotions in Virtual Capture check box.
|
||||||
| Promotions Screen Text | Enter the message to appear within the top of the Promotions screen that is presented when an eligible applicant logs in to the instance of Virtual Capture after selecting a product. | ||||||
| Exit Guest Application |
Allows institutions to identify if applicants are prompted to create an online profile or resume the application when they save and exit an application. This parameter allows administrators to select the following values from the drop-down:
Based on the selection made in this parameter, applicants will see either the |
||||||
| Exit Guest Application Screen Text |
This parameter allows institutions to override the hard-coded message that displays to an applicant when exiting a guest application.
|
||||||
| Disbursement Confirmation Text | Enter the text to appear within a system confirmation message generated upon clicking  on the last screen of the Approval workflow in the Virtual Capture instance. The disbursement process is initiated after the applicant confirms disbursement can be performed. on the last screen of the Approval workflow in the Virtual Capture instance. The disbursement process is initiated after the applicant confirms disbursement can be performed. |
||||||
| Disbursement Success Text |
Enter the text to appear within a system success message generated after disbursement is successful in the instance of Virtual Capture.
|
||||||
| New Account Holder Disbursement success message |
Enter the text that appears to a new account holder within a system success message generated after disbursement is successful in the instance of Virtual Capture.
|
||||||
| Number of times to check for post disbursement documents |
This parameter enables Virtual Capture to check for documents that become available to the applicants, after their application is disbursed. Enter the number of times Virtual Capture checks for post-disbursement documents.
|
||||||
| Wait to check for post disbursement documents (seconds) |
Enter the number of seconds Virtual Capture waits before checking for post-disbursement documents. If no documents are found, Virtual Capture waits the number of seconds identified in this parameter, before checking again. Virtual Capture continues to check for documents, until the value identified in the "Number of times to check for post disbursement documents" parameter is reached.
|
||||||
| Days to show disbursed applications |
Enter the number of days that an application displays within the Virtual Capture Application Listing Page for the instance, after it has been disbursed. By default, this parameter is set to 30.
|
||||||
| Days to show withdrawn applications |
Enter the number of days that an application displays within the Virtual Capture Application Listing Page for the vendor instance, after it has been withdrawn. By default, this field is set to 0.
|
||||||
| Disbursement document panel message |
Enter the text that appears to an applicant within the Document Sets screen after disbursement is successful in the instance of Virtual Capture.
|
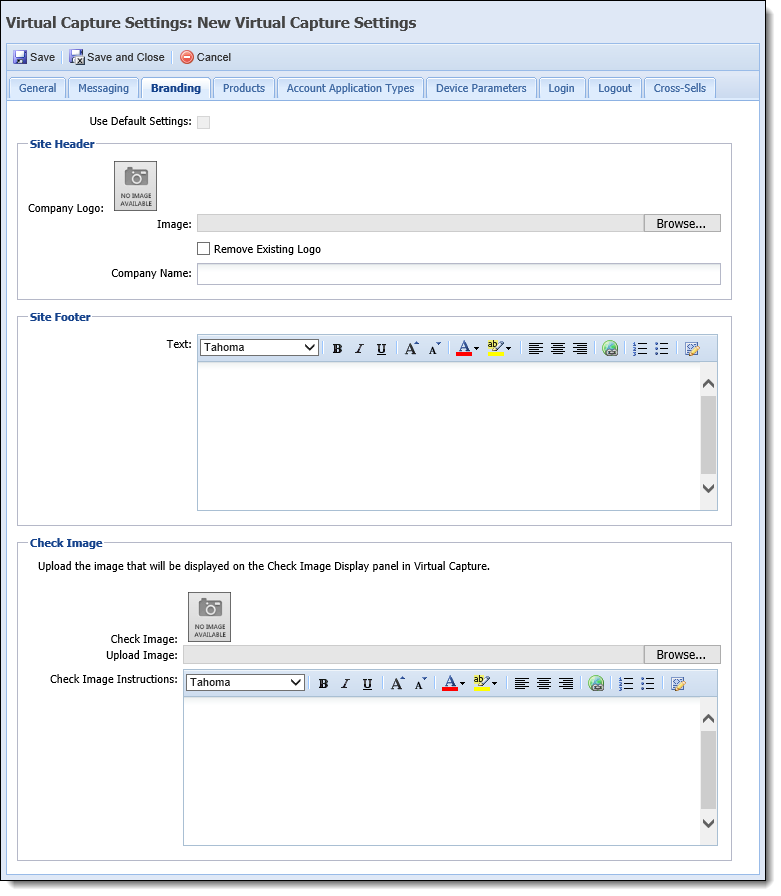
The Branding tab provides the ability to define the logo and text to display within the Site Header and Footer of the Virtual Capture instance, as well details for the Check Image field. This tab can be used to customize the branding that displays within a virtual application in order to appeal to a specific group of applicants.
When a default instance is assigned within the General tab, the Use Default Settings check box can be used to automatically copy the Branding attributes defined for the default instance to the instance being created.
|
This check box is disabled when Default Instance is set to None within the General tab. |
If it is desired to copy the Branding attributes from the default instance, select the Use Default Settings check box within the top of the Branding tab; otherwise, leave the Use Default Settings check box blank to define unique values for the instance.
|
Once the Use Default Settings check box is selected, the fields within each section of this tab are disabled, and populate with the values defined for the default instance. To learn more about this functionality, please see Default Instance within the General section of this topic. |
The Branding tab includes the following sections:
| Section | Description |
| Site Header | Provides the ability to define the company logo and name to appear within the top navigation bar in the instance of Virtual Capture. |
| Site Footer |
Provides the ability to define the footer to appear within the instance of Virtual Capture. |
| Check Image |
Provides the ability to upload the sample check image to be displayed for the Check Image field in the instance of Virtual Capture, and define the instructions for applicants to use as a guide in customizing their checks during the virtual application process. |
When Use Default Settings is not selected within the top of the tab, the following attributes are editable within each section, and able to be defined for the instance:
| Attribute | Description | ||||
| Site Header | |||||
| Company Logo |
Displays the logo to appear within the site header of the Virtual Capture instance. When an instance is first created, the following image displays:
|
||||
| Image |
Click Browse... to locate and upload a new logo image for the Virtual Capture instance (maximum height of 50 pixels).
|
||||
| Remove Existing Logo | Select this check box to remove the existing company logo. | ||||
| Company Name | Enter the name of the company associated with the Virtual Capture instance. The Company Name displays within the navigation bar at the top of the Virtual Capture web page. | ||||
| Site Footer | |||||
| Text |
Enter the text to display within the footer of the web page for the Virtual Capture instance.
|
||||
| Check Image | |||||
| Check Image |
Displays the image of the sample check that populates for the Check Image field in a virtual application. When an instance is first created, the following image displays:
|
||||
| Upload Image |
Click Browse... to locate and upload the image to be used to display data for the Check Image field in the Virtual Capture instance.
|
||||
| Check Image Instructions | Enter the text to display as instructions to assist applicants with customizing their checks in a virtual application. | ||||
|
For more information on the Check Image field, please see the Account Product Check Image Field example in this guide. |
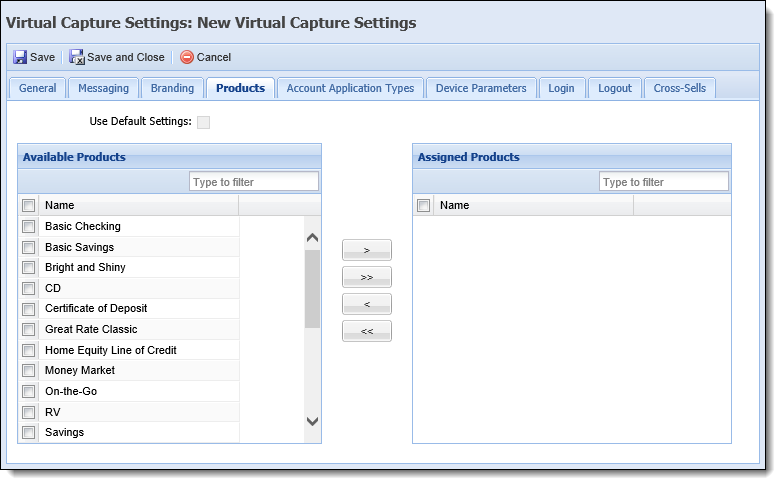
The Products tab provides the ability to determine which products are available in the instance of Virtual Capture. This tab can be used to customize the products a specific group of applicants is able to apply for during the virtual application process.
When a default instance is assigned within the General tab, the Use Default Settings check box can be used to automatically copy the Product attributes defined for the default instance to the instance being created.
|
This check box is disabled when Default Instance is set to None within the General tab. |
If it is desired to use the same products from the default instance, select the Use Default Settings check box within the top of the Products tab; otherwise, leave the Use Default Settings check box blank to define unique values for the instance.
|
Once the Use Default Settings check box is selected, the fields within this tab are disabled, and populate with the values defined for the default instance. To learn more about this functionality, please see Default Instance within the General section of this topic. |
When Use Default Settings is not selected, the following attributes are editable within the Products tab, and able to be defined for the instance:
| Attribute | Description |
| Available Products |
Displays a list of the products that can be assigned to the instance. This list includes all products configured in System Management > Origination > Virtual Capture > Virtual Capture Products. To assign a product, select the desired product from the list, and move it to the Assigned Products box using the arrows, or by dragging and dropping the value. |
| Assigned Products | Displays a list of the products to be available in Virtual Capture. When an applicant begins an application in the instance of Virtual Capture, the products within this box are available as an option to select within the Product Selection page. |
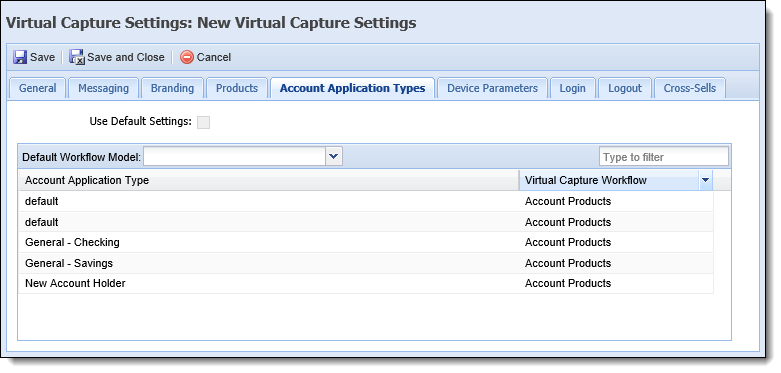
The Account Application Types tab provides the ability to set a default workflow model for Virtual Capture applications that only include account products, as well as assign a Virtual Capture workflow model to each Account Application Type for the instance.
When a default instance is assigned within the General tab, the Use Default Settings check box can be used to automatically copy the Account Application Type attributes defined for the default instance to the instance being created.
|
This check box is disabled when Default Instance is set to None within the General tab. |
If it is desired to use the same Account Application Type attributes from the default instance, select the Use Default Settings check box within the top of the Account Application Types tab; otherwise, leave the Use Default Settings check box blank to define unique values for the instance.
|
Once the Use Default Settings check box is selected, the fields within this tab are disabled, and populate with the values defined for the default instance. To learn more about this functionality, please see Default Instance within the General section of this topic. |
When Use Default Settings is not selected, the following attributes are available within the Account Application Types tab, and able to be defined for the instance:
| Attribute | Description | ||||
| Account Application Type |
Displays a read-only list of the active Account Application Types configured in System Management > Origination > Account > Account Application Types.
|
||||
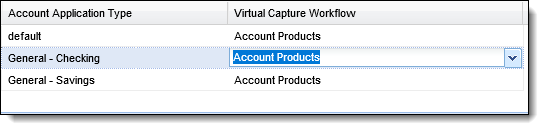
| Virtual Capture Workflow |
Displays an editable list of the Virtual Capture Workflow Models assigned to each Account Application Type. When an Account Application Type does not have a workflow model assigned, a blank value appears in this column. When a row is clicked, the field becomes editable, and allows administrators to select a value from a drop-down list that includes all Virtual Capture Workflow Models configured in System Management > Origination > Virtual Capture > Virtual Capture Workflow Models.
|
The Default Workflow Model field in the top of the tab determines the workflow model that is used in a virtual application when an Account Application Type does not have a workflow model assigned. This field defaults to the first active workflow model configured in the Virtual Capture Workflow Models page in System Management, but can be modified by selecting a new value from the drop-down list.
|
The Default Workflow Model drop-down includes a list of all active Virtual Capture Workflow Models. If a workflow model is disabled in the Virtual Capture Workflow Models page, the workflow model does not appear in the Default Workflow Model drop-down list.
|
In order for account applications to be created in a Virtual Capture instance, a Product Selection rule to set the Account Application Type must be authored in System Management > Origination > Rules Management. The Product Selection Rule generates an application for the appropriate Account Application Type based on the criteria defined in the rule. For example, if a different account application type must be assigned for a Checking account product and Savings account product, a Product Selection rule can be authored using host values to set the Account Application Type based on the value of the Account Product Category and Sub-Category.
The following example illustrates a Product Selection decision table rule written under the Application.AccountProducts entity to set Account Application Types based on the Account Product Category and Sub-Category:
 |
There are many ways to author a rule; therefore, the following rule should be used as an example ONLY. |

An example of a rule condition for Category and Sub-Category is as follows:
|
If setting multiple Account Application Types in the rule, a separate Category and Sub-Category condition must be defined for each Account Application Type being set. |
Category

Sub-Category

|
For information on authoring rules, please see the Rules Management topic in this guide. |
Using the above example, when an applicant applies for a checking account product in Virtual Capture, the application is created using the General - Checking account application type. During the application process, the applicant is presented with the Virtual Capture Workflow Model assigned to the General - Checking application type in the Account Application Types tab of Virtual Capture Settings.
|
When only account products have been selected, and an applicant applies for multiple account products at once, if any of the account products are assigned different account application types, the system automatically creates the application using the account application type for the first account product added to the application. |
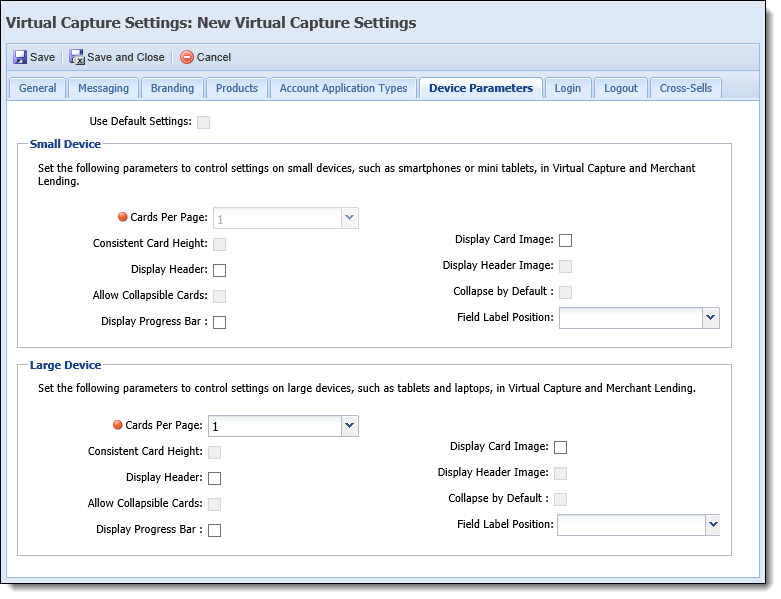
The Device Parameters tab provides administrators with the ability to configure the look and feel of the virtual application on both small and large devices. Within this tab, administrators can set parameters to control how the virtual application is presented on each type of device an applicant may use to access the instance of Virtual Capture. For example, a large device such as a tablet or laptop, or a small device, like a smart-phone or mini tablet.
|
A device that has a width of 768 pixels or greater is considered a large device. |
When a default instance is assigned within the General tab, the Use Default Settings check box can be used to automatically copy the Device Parameter attributes defined for the default instance to the instance being created.
|
This check box is disabled when Default Instance is set to None within the General tab. |
If it is desired to copy the Device Parameter attributes from the default instance, select the Use Default Settings check box within the top of the Device Parameters tab; otherwise, leave the Use Default Settings check box blank to define unique values for the instance.
|
Once the Use Default Settings check box is selected, the fields within this tab are disabled, and populate with the values defined for the default instance. To learn more about this functionality, please see Default Instance within the General section of this topic. |
When Use Default Settings is not selected, the following attributes are editable within the Device Parameters tab, and able to be defined for the instance:
| Device Parameter | Description | ||||||
| Cards Per Page |
Select one of the following options to identify the number of product cards to display in a row within the Product Selection page of the Virtual Capture instance:
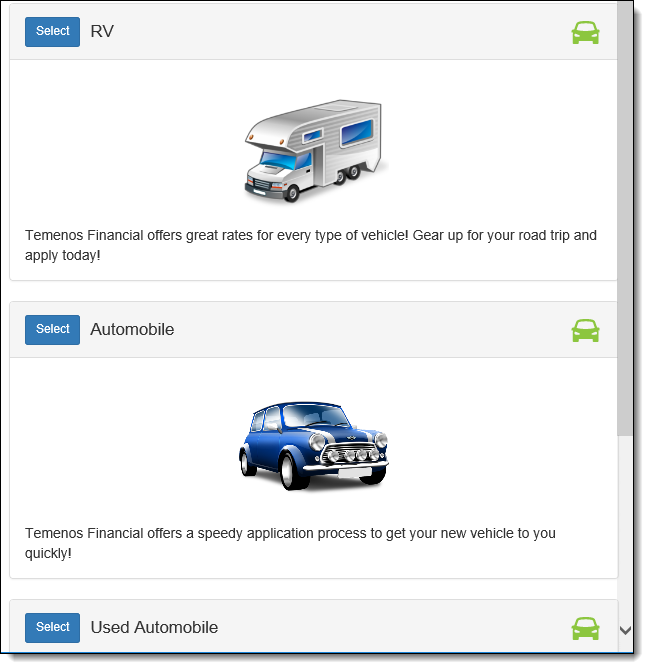
The below example displays how the product cards appear in the Product Selection page when the Cards Per Page parameter is set to 3 on a large device:
|
||||||
| Consistent Card Height |
Select the check box to configure all product cards to be the same height within the Product Selection page.
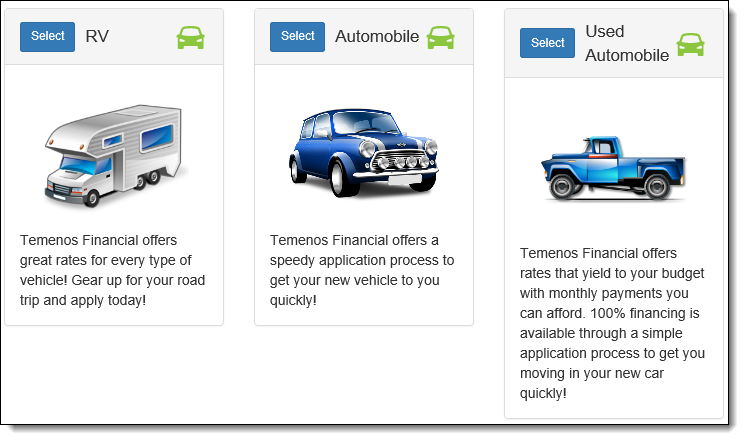
When selected, all product cards are set to the same height as the tallest card on the page. If this check box is not selected, the height of the product cards is determined by the amount of content within the card, and does not display consistently within the Product Selection page. In the following example, the Consistent Card Height parameter is set to true for a large device; therefore, each product card is set to the same height.
In the example below, the Consistent Card Height parameter is set to false; therefore the height of each product card is determined by the amount of content included in the body of the card:
|
||||||
| Display Card Image |
Select the check box to display the large image for the product within the body of the product card.
|
||||||
| Display Header |
Select the check box to display a header row in the top of each product card.
In the following example, the Display Header parameter is set to true; therefore a gray header row is displayed within the product card:
When the Display Header parameter is set to false, the product card appears as shown below:
|
||||||
| Display Header Image |
Select the check box to display the small image for the product within the right side of the header row in the product card.
|
||||||
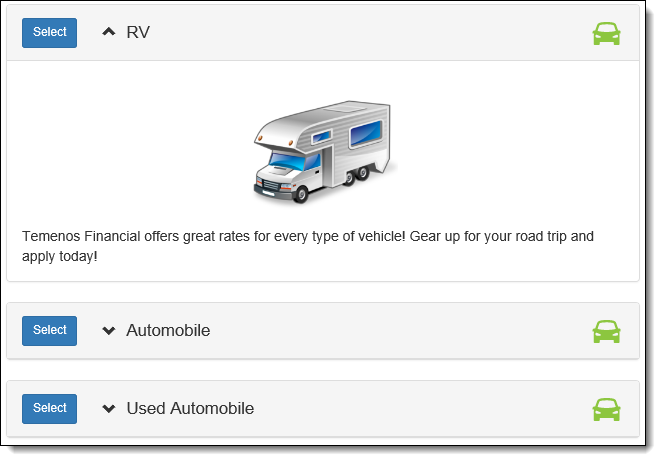
| Allow Collapsible Cards |
Select the check box to allow the product cards to be collapsed and expanded in the Product Selection page.
In the following example, the Allow Collapsible Cards parameter is set to true; therefore a "^" appears next to the product name in the header row of the card to allow the applicant to easily expand and collapse each product:
When the Allow Collapsible Cards parameter is set to false, the expand/collapse behavior is not available and the full card is displayed for each product as shown below:
|
||||||
| Collapse by Default |
Select the check box to display all product cards in a collapsed view when the Product Selection page is accessed in the instance of Virtual Capture.
|
||||||
| Display Progress Bar |
Select the check box to display a progress bar in the top of the Virtual Capture application, which can be used to assist applicants with tracking their progress through the Origination stage of the workflow.
The progress bar is calculated based on the total amount of panels across all of the Origination screens assigned to the Virtual Capture Workflow Model, and automatically adjusts as applicants move forward or backward through a workflow to display their percentage of completion.
When set to false, the progress bar does not display in the application.
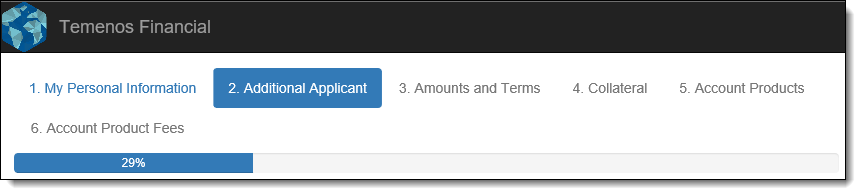
In the following example, the Display Progress Bar parameter is set to true for the instance; therefore, a bar displays within the top of the Virtual Capture application to identify the percentage of the workflow completed by the applicant:
|
||||||
| Field Label Position |
Select one of the following options from the drop-down list to determine if field labels appear to the left of a field text box, or above a field text box in the instance of Virtual Capture:
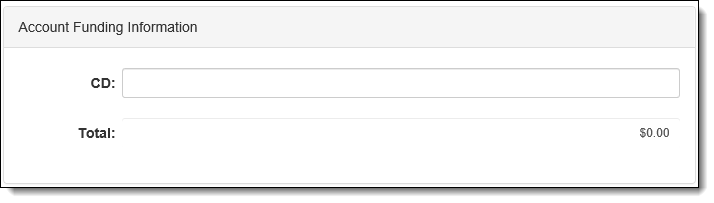
The following example demonstrates how field labels appear when the Field Label Position is set to Left:
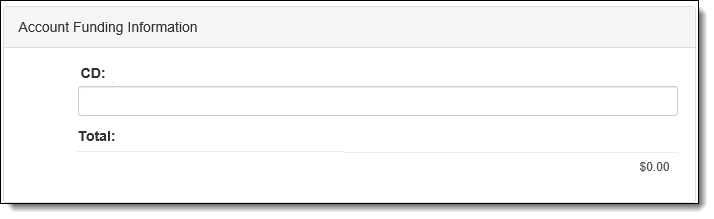
The following example demonstrates how field labels appear when the Field Label Position is set to Top:
|
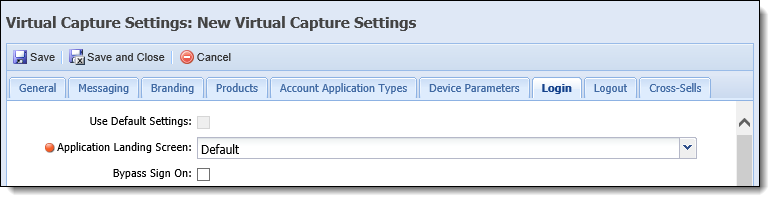
The Login tab provides the ability to determine how the log-in process works in the instance of Virtual Capture. This tab can be used to configure the settings for each login method available for an applicant to access Virtual Capture.
|
The fields and sections in the Login tab dynamically display based on the Instance Type set within the General tab. |
At the top of the Login tab, the following parameters are available:
| Parameter | Description | ||||||
| Use Default Settings |
When a default instance is assigned within the General tab, the Use Default Settings check box can be used to automatically copy the Login attributes defined for the default instance to the instance being created.
If it is desired to copy the Login attributes from the default instance, select the Use Default Settings check box within the top of the Login tab; otherwise, leave the Use Default Settings check box blank to define unique values for the instance.
When Use Default Settings is not selected within the top of the tab, the subsequent attributes, in the section below, are able to be defined each Instance Type.
|
||||||
| Application Landing Screen |
Allows institutions to determine the Log In screen that appears when applicants log into an Individual instance of Virtual Capture. This screen allows the applicant to enter information to create the application, such as name and TIN. Select the desired screen from the drop-down list.
|
||||||
| Bypass Sign On |
Allows institutions to determine if applicants are able to bypass the log in screen when creating an application.
|
When the Instance Type is set to Individual, the Login tab includes the following sections:
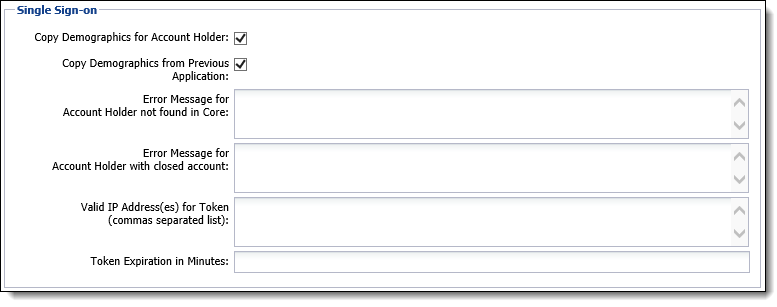
Single Sign-on (SSO) is available when an applicant accesses an instance of Virtual Capture through a financial institution web site where he or she has been previously authenticated. Using this login method, once an applicant selects a product in Virtual Capture, they are not prompted to enter their login information. An HTTPS request is used to validate the applicant's Username, Password, Person Number, Account Number, and TIN with information stored in the core.
The Single Sign-On section provides administrators with the ability to define the error messages received when an applicant signs in to the instance of Virtual Capture through their financial institution's web site.
The following attributes are defined within this section of the Login tab:
| Attribute | Description | ||||
| Copy Demographics for Account Holder |
By default, this parameter is set to true to pre-populate address, phone, and income information from the core for existing account holders in Virtual Capture. If set to false, the system does not populate the applicant's income and demographic data from the core in the Virtual Capture.
|
||||
| Copy Demographics from Previous Applications |
By default, this parameter is set to true to pre-populate address, phone, and income information from the most-recent application on record for an existing account holder in Virtual Capture. If set to false, the system does not populate income and demographic data from the applicant's previous application in Virtual Capture.
|
||||
| Error Message for Account Holder not found in Core | Enter the error message text to display when the Last Name, SSN and Account Number entered within a screen in Virtual Capture do not match an account in the financial institution's core system. | ||||
| Error Message for Account Holder with closed account | Enter the error message text to display when the Account Number entered within a screen in Virtual Capture matches a closed account. | ||||
| Valid IP Addresses(es) for Token (commas separated list) |
Enter the IP Addresses that are permitted to access the instance of Virtual Capture. When an applicant tries to access the Virtual Capture instance from an IP Address that is not in this list, the applicant receives an error to inform that the single sign-on request could not be authenticated, and is unable to access the Virtual Capture application. If no IP Addresses are included in this list, applicants are able to access the Virtual Capture application from any IP Address.
|
||||
| Token Expiration in Minutes |
Enter the number of minutes that the session token for the Virtual Capture instance is considered valid. After the number of minutes defined within this field expires, an error is received to inform that the token has expired and a new request to access Virtual Capture must be made.
|
The Guest Login section provides administrators with the ability to configure the login process for applicants who access the instance of Virtual Capture through an Online Profile or Guest application. The information configured within this section determines the error messages that return during the login process, as well as the information that appears within the Guest Login panel in the Login screen, or the Start New Application screen presented when an application is created under an Online Profile. Within this section, system administrators are also able to activate the Guest Verification process for the Virtual Capture instance, and determine the email message sent to applicants with and without existing guest applications.

The following attributes are defined within the Guest Login section of the Login tab:
| Field | Description | ||||
| Error Message for Account Holder not found in Core | Enter the error message text to display upon clicking  in the Guest Login panel or Start New Application screen when the applicant selects Yes from the Member drop-down, and the Last Name, SSN and Account Number entered do not match an account in the financial institution's core system. in the Guest Login panel or Start New Application screen when the applicant selects Yes from the Member drop-down, and the Last Name, SSN and Account Number entered do not match an account in the financial institution's core system. |
||||
| Error Message for Account Holder with closed account | Enter the error message text to display upon clicking in the Guest Login panel or Start New Application screen when the applicant selects Yes from the Member drop-down, and the Account Number entered matches a closed account. |
||||
| Panel Title |
Enter the title to display at the top of the Login panel in the instance of Virtual Capture.
|
||||
| Instructions | Enter instructions or other text to appear within the Login screen for the instance of Virtual Capture. This text provides applicants with direction in completing the screen. | ||||
| Is Member Label |
Enter the name of the Member drop-down that appears within the Guest Login panel or Start New Application screen.
|
||||
| Account Number Label |
Enter the name of the Account Number field that appears within the Guest Login panel or Start New Application screen.
|
||||
| Hide Account Number |
Select this check box to determine whether or not an account number is required to initialize the virtual application process. When this check box is selected, the Account Number field does not appear within the Guest Login panel or Start New Application screen.
|
||||
| Guest Verification | |||||
| Activate Guest Verification |
Select the check box to enable the Guest Verification process for the Virtual Capture instance. By default, this parameter is set to false. When set to true, an
|
||||
| Guest Verification Email |
Select the email to be sent to an applicant upon clicking
|
||||
| Guest Verification Email with No Application |
This section provides the ability to define the Subject and Body of the email sent to an applicant upon clicking
|
||||
The Blacklist IP Addresses section provides administrators with the ability to enable IP address tracking, and configure the error message that displays when an applicant's IP address is blacklisted.

The following attributes are defined within this section of the Login tab:
| Field | Description | ||||
| Capture IP Address |
Select this check box to enable IP address tracking for the Virtual Capture instance.
When an application is saved in Virtual Capture, the IP address is stored within the IPAddress field. If the IP address fulfills the Blacklist parameters defined in System Management > Modules > Origination, the IP address is prohibited, and displayed within the list of blacklisted IP addresses in System Management > Origination > Virtual Capture > Blacklist IP Addresses.
|
||||
| Error Message for Blacklisted IP Address |
Enter the error message to display in the instance of Virtual Capture when an applicant's IP address is blacklisted.
|
|
For more information on IP address blacklisting, please see the Blacklist IP Address topic within this guide. |
When the Instance Type is set to Vendor, the Login tab appears as shown below:
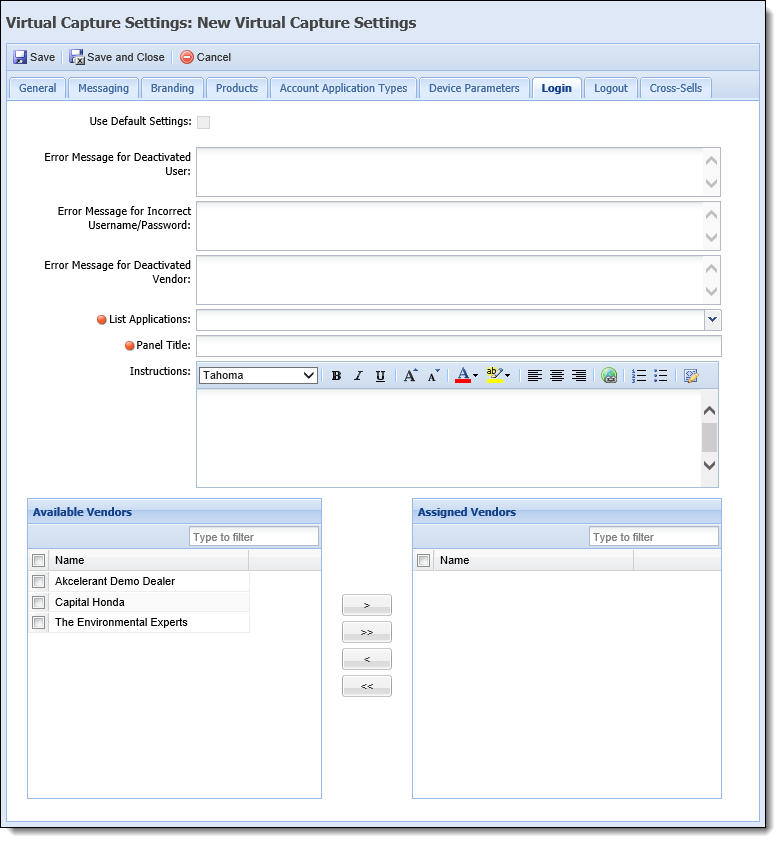
The following Login attributes are defined for each Vendor instance:
| Field | Description | ||||||||||
| Error Message for Deactivated User |
Enter the error message text to display within Virtual Capture when a deactivated vendor user attempts to access the instance.
|
||||||||||
| Error Message for Incorrect Username/Password |
Enter the error message text to display within Virtual Capture when a vendor user attempts to access an instance with an incorrect username and/or password.
|
||||||||||
| Error Message for Deactivated Vendor | Enter the error message text to display within Virtual Capture when a vendor user attempts to access an instance that is not assigned to the vendor. | ||||||||||
| List Applications |
Select one of the following values from the drop-down list to determine whether applications are displayed for the Vendor or Vendor Contact in the Application Listing page for the instance:
|
||||||||||
| Panel Title |
Enter the name of the login panel as it should appear in the instance of Virtual Capture. This field is required.
|
||||||||||
| Instructions | Enter the text to display as instructions to assist vendor users with logging in to Virtual Capture. |
The two-box control in the bottom of the tab includes the following attributes, which provide the ability to determine which vendors have access to the instance of Virtual Capture:
| Attribute | Description | ||
| Available Vendors |
Displays a list of the vendors that can be assigned to the instance of Virtual Capture. This list includes all vendors configured in System Management > Origination > Loan > Vendor Management.
To assign a vendor to the instance, select the desired vendor from the list, and move it to the Assigned Vendors box using the arrows, or by dragging and dropping the value. |
||
| Assigned Vendors |
Displays a list of the vendors permitted to access the instance of Virtual Capture.
|
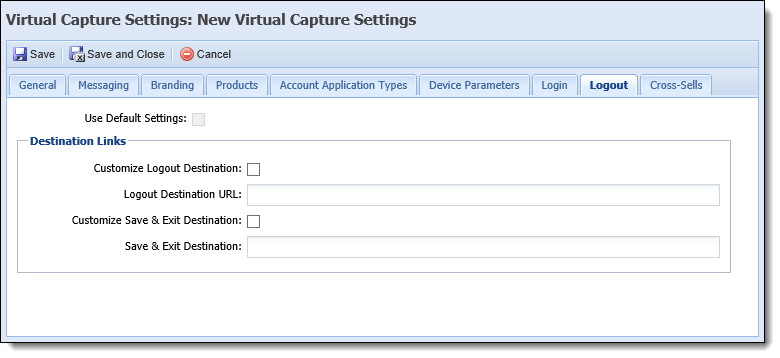
The Logout tab provides the ability to determine the URL destination where applicants are navigated to upon selecting Sign Out in the Navigation Bar, or clicking the Save and Exit button in a Virtual Capture application. By default, all applicants are navigated to the Product Selection page upon exiting a Virtual Capture application, unless a customized destination is defined within the Logout tab.
When a default instance is assigned within the General tab, the Use Default Settings check box can be used to automatically copy the Logout attributes defined for the default instance to the instance being created.
|
This check box is disabled when Default Instance is set to None within the General tab. |
If it is desired to copy the Logout attributes from the default instance, select the Use Default Settings check box within the top of the Login tab; otherwise, leave the Use Default Settings check box blank to define unique values for the instance.
|
Once the Use Default Settings check box is selected, the fields within this tab are disabled, and populate with the values defined for the default instance. To learn more about this functionality, please see Default Instance within the General section of this topic. |
When Use Default Settings is not selected within the top of the tab, the following Destination Links are able to be defined for the instance:
|
When any of the below check box fields are cleared, the value within the corresponding URL text box is also cleared. |
| Attribute | Description | ||||
| Customize Logout Destination | Select the check box to customize the location where applicants are navigated to upon selecting Sign Out in the Navigation Bar. Once selected, the text box for the Logout Destination URL is enabled. | ||||
| Logout Destination URL | Enter the URL location where the applicant should be navigated to upon logging out of a Virtual Capture instance. | ||||
| Customize Save & Exit Destination | Select the check box to customize the location where applicants are navigated to upon clicking Save & Exit in a Virtual Capture application. Once selected, the text box for the Save & Exit Destination is enabled. | ||||
| Save & Exit Destination |
Enter the URL location where the applicant should be navigated to upon clicking Save & Exit in a Virtual Capture application.
|
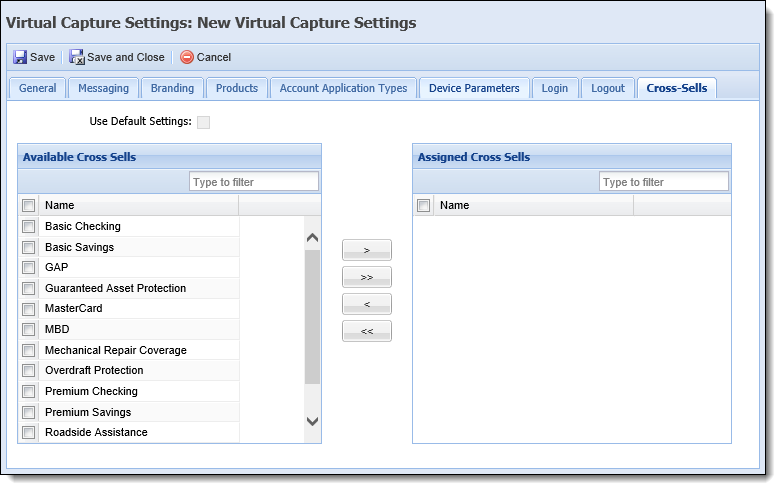
The Cross-Sells tab provides the ability to determine which cross-sells are available in the instance of Virtual Capture. This tab can be used to customize the cross-sells that can be offered to a specific group of applicants during the virtual application process.
When a default instance is assigned within the General tab, the Use Default Settings check box can be used to automatically copy the Cross-Sell attributes defined for the default instance to the instance being created.
|
This check box is disabled when Default Instance is set to None within the General tab. |
If it is desired to use the same cross-sells from the default instance, select the Use Default Settings check box within the top of the Cross-Sells tab; otherwise, leave the Use Default Settings check box blank to define unique values for the instance.
|
Once the Use Default Settings check box is selected, the fields within this tab are disabled, and populate with the values defined for the default instance. To learn more about this functionality, please see Default Instance within the General section of this topic. |
When Use Default Settings is not selected, the following attributes are editable within the Cross-Sells tab, and able to be defined for the instance:
| Attribute | Description |
| Available Cross-Sells |
Displays a list of the cross-sells available to assign the instance. This list includes all products configured in System Management > Origination > Virtual Capture > Virtual Capture Cross-Sells.
To assign a cross-sell product, select the desired cross-sell from the list, and move it to the Assigned Cross-Sells box using the arrows, or by dragging and dropping the value. |
| Assigned Cross-Sells | Displays a list of the cross-sells to be available in Virtual Capture. When an applicant creates an application in the instance of Virtual Capture, any cross-sells from this box that an applicant is eligible for are able to be offered through the Cross-sells panel during the application process. |
The Virtual Capture Settings page allows administrators to create and manage Virtual Capture instances for their instances. From this page, administrators are able to perform the following actions:
To create a Virtual Capture instance:
 within the top of the Virtual Capture Settings page to open the instance configuration window.

 within the top of the configuration window to create the instance.
 |
Any changes made within the Virtual Capture Settings page are not applied to the Virtual Capture instance until the web application is refreshed. By default, Virtual Capture is automatically refreshed every 30 minutes to apply the updated configurations to the Virtual Capture applications.
|
To copy a Virtual Capture instance:
 .
. |
Modifying the Instance Code changes the URL for the instance, and causes any existing links to the instance to break; therefore, when an Instance Code is modified, a message is presented to ensure that the value of the Instance Code should be changed. If it is desired to change the value, click Yes to update the Instance Code for the instance. Upon clicking Yes, the message is closed, and the Home URL is updated to include the new Instance Code. |
to create the new instance.To edit a Virtual Capture instance:
 . to retain the updated settings.
 |
If an instance is set as the Default Virtual Capture Instance within the Origination tab in System Management > Modules > Origination, or is assigned as the Default Instance, or parent, for another instance in the General tab of Virtual Capture Settings, the instance cannot be deleted. Upon clicking Yes to confirm that the instance should be deleted, an error is presented to inform that the instance cannot be removed since it is assigned as the Default Virtual Capture Instance, or the parent to one or more instances. |
To delete a Virtual Capture instance:
 .
. |
When an instance is deleted, it is removed from Virtual Capture Settings, but the data remains in the database. |

 button within the Product Card is replaced with the
  button.
 (counter) does not appear for account products configured to allow multiple instances on an application. An application starts with one instance of the account product selected.
 button, when saving and exiting a guest application. When clicked, applicants are directed to the Create an Online Profile screen.
 button, when saving and exiting a guest application. When clicked, applicants are directed back to the page in the application where
  was clicked.
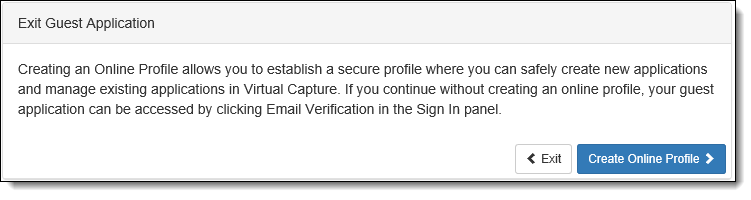
 to view the field in HTML mode.
 Example
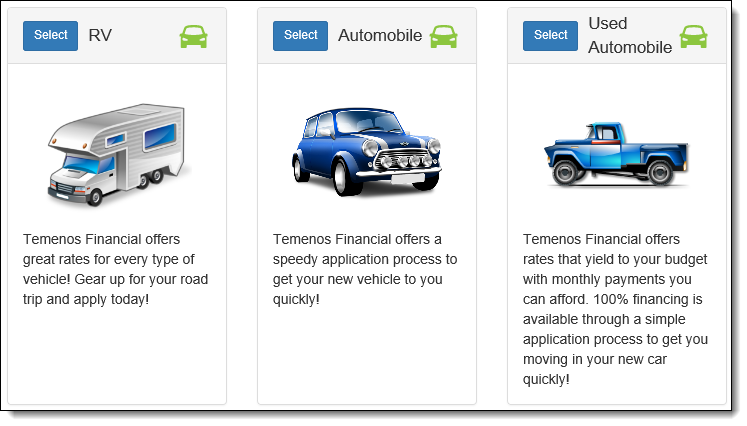


 button appears within the Sign In panel in Virtual Capture, which allows applicants to access applications previously created as a Guest without creating an Online Profile.